Migrate your tenant to (with single sign-on)

If you use single sign-on to manage access to , you need to adjust your single sign-on settings in before you migrate to the domain, and adjust single sign-on settings in your IDP after you migrate your tenant to the domain.

Important: Only Organization Administrators can complete this process.
At a high level, completing the migration requires:
  1. Enabling local authentication for Organization Administrators.
  2. Running the migration.
  3. Downloading new SAML metadata from .
  4. Updating SSO settings in your IDP.

Each one of these steps is described in greater detail below.

Enable local authentication for Organization Administrators

By default, after you enable single sign-on, Organization Administrators can sign into with their username and password (local credentials) in addition to their IDP credentials. When you disable local user authentication, Organization Administrators can only access using single sign-on.
CAUTION: To avoid getting locked out of , allow local authentication (described above) before you perform the migration to , and only disable local authentication after you verify single sign-on is working as expected.
  1. Go to My Organization > Authentication.
  2. Select Edit.
  3. Select Next.
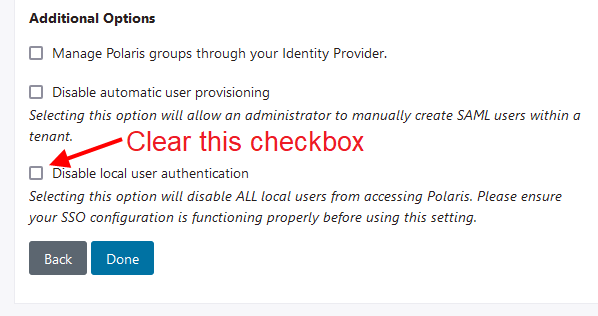
  4. If necessary, clear the checkbox next to Disable local user authentication and select Done.

    Screenshot of the Disable local user authentication checkbox.
  5. Test your local credentials:
    1. Sign out of .
    2. Sign in to using your Email Address and Password.
      If necessary, you can reset your password:
      1. Sign into (using SSO).
      2. Go to My Organization > Users.
      3. Select your Email Address.
      4. Select Reset Password.
      5. Check your email for a message from () with a link you can use to reset your password.

Run the migration

CAUTION: To avoid getting locked out of , allow local authentication until you update your single sign-on configuration and verify it's working as expected.
  1. Go to My Organization > General.
    Note your Organization Name, listed near the top of the page. You'll need this in a later step.
  2. Under Black Duck Migration, select Start Migration.
    A confirmation appears.
  3. Enter your organization name and select Start Migration.
    Note: While the migration runs, users in your organization will not be able to sign into .
  4. When the migration is complete, select Reload.
    The Sign in page opens.
  5. Sign in to using your local (non-SSO) credentials.

Download new SAML metadata

Next, download new SAML metadata from .
  1. Go to My Organization > Authentication.
  2. Select Download Metadata.

Update settings in your IDP

The steps to complete this process vary from IDP to IDP, but you need to extract the following values from the sso_saml_metadata.xml file, and use them to reconfigure single sign-on settings in your IDP.
  • The single sign-on URL for (found in the Location attribute of md:AssertionConsumerService).
  • The entity ID for (found in the entityID attribute of md:EntityDescriptor).
  • If you configured a single sign-out URL for , the single logout URL for (found in the Location attribute of md:SingleLogoutService).

Instructions for Azure (via Microsoft Entra ID) and Okta customers are included for reference:

Okta: update an app integration

To update an Okta app integration, follow these steps:
CAUTION: If you haven't done so already, Enable local authentication for Organization Administrators before you proceed.
  1. Open the Okta Admin Dashboard and go to Applications > Applications.
  2. Select the app integration you created for .
  3. Open the General tab.
  4. Under SAML Settings, select Edit.
  5. Select Next.
  6. Update the application's Single sign-on URL.
    Note: Find this URL in the Location attribute of md:AssertionConsumerService in the sso_saml_metadata.xml file.
  7. Update the application's Audience URI (SP Entity ID).
    Note: Find this value in the entityID attribute of md:EntityDescriptor in the sso_saml_metadata.xml file.
  8. At the bottom of the page, select Next.
  9. Select Finish.

Azure (via Microsoft Entra): update an enterprise application

To update an enterprise application's single sign-on settings, follow these steps:
CAUTION: If you haven't done so already, Enable local authentication for Organization Administrators before you proceed.
  1. In the Azure Portal, go to Enterprise Applications, and open the application you created for .
  2. Go to Manage > Single sign-on.
  3. Select Upload metadata file and upload the sso_saml_metadata.xml file you downloaded from .
    Azure extracts the Identifier (Entity ID), Reply URL (Assertion Consumer Service URL), and Logout URL (Optional) values from the file.
  4. Select Save.

Test your single sign-on settings

Remember to test single sign-on before you disable local authentication.

Troubleshooting

Can't sign into after running the migration

If you can't use your local credentials to sign into after you run the migration, you may be able to update SSO settings in your IDP manually. Completing this successfully will allow you to sign into using SSO.

Tip: If your local password for isn't working, another Organization Administrator in your organization may be able to reset it for you.

The steps to complete this process vary from IDP to IDP, but you need to update 2-3 URLs in the SSO settings saved in your IDP:

  • Service provider entity ID (for example, https://polaris.synopsys.com/auth/realms/docs)
  • Single sign-on URL (for example, https://polaris.synopsys.com/auth/realms/docs/broker/sso/endpoint)
  • (Optional) Single logout URL (for example, https://polaris.synopsys.com/auth/realms/docs/broker/sso/endpoint)

Replace "synopsys" with "blackduck" (for example, https://polaris.synopsys.com/auth/realms/docs > https://polaris.blackduck.com/auth/realms/docs) in these URLs and save your changes.